Something I’ve been wanting to do for awhile I finally got to do a week ago. That is install the custom firmware Tomato on our Linksys WRT54G v.2 wireless router. Prior, I had only been using the router as an access point and not the full up router/firewall it was designed to be. This is due to the VOIP router (Dlink 1120M) that was provided by AT&T( as a part of their CallVantage service) was presently serving that role.
It was just easier at the time to have the AT&T box fill the role as I didn’t really feel like trying to get it working behind another router.
I was a bit worried about doing the firmware update as I REALLY didn’t want to brick the thing, but, curiosity got the best of me. I downloaded the latest FW revision from Tomato’s website, logged into the Linksys admin panel, used the built-in update page, uploaded the firmware file and crossed my fingers. When it was done, it restarted and I had that wonderful red toned Tomato admin screen. It even kept all my old settings.
After seeing what all I could do, I knew I needed to get this thing acting in the role it was intended. This meant that I needed to get the AT&T Router functioning behind this one. I’m going to spare you my trial and error and give you what you need to know ahead of time.
Our Goal
Linksys Router with Tomato Firmware will sit between the Cable Modem and our network. The VOIP router will connect to the Linksys switch via a single cable that goes from its(VOIP Router) WAN port to the LAN port on the Linksys. We still want to be able to access the Admin Panel on both units at any time.
The Setup
I’m going to define our settings for this example, you just need to replace these with your current settings to follow along at home.
Dlink DVG-1120M Voip Router
LAN: IP: 192.168.1.1 Subnet: 255.255.255.0
WAN: IP: DHCP (Address provided by ISP)
Linksys WRT-54G
LAN: IP: 192.168.1.2 Subnet: 255.255.255.0
WAN: IP: N/A
Step 1: Go static
Before you start, you should set your current workstation to use a static IP. I recommend something high outside of the dhcp range, ex. 192.168.1.250 - You can change it back to DHCP later if you want. If you already have a static ip, then you don’t need to do anything.
Step 2: Enable admin access via WAN on the VOIP router
By default (and for good reason) routers don’t typically allow access to the admin panel via the WAN port. This keeps hackers on the outside from even attempting to login to your router. Since we are going to have the VOIP device behind our linksys router, we don’t have that concern. The only cable that will be connected to the VOIP device (besides the phone line and power cable) is a cat5 connection from the VOIP device to a LAN port on the Linksys router. Because of this, we need to be able to access the device over WAN. Different VOIP devices will no doubt have different ways to do this. Some may allow the ability to turn this on via a WEB console, the D-Link DVG-1120M does NOT. To enable WAN Access on this device, you need to use TELNET. You can do this through a Terminal Window in linux or using something like PuTTY.
- Telnet to IP: 192.168.1.1
- Login/pass (if it hasn’t changed) is admin/admin
Enter the following commands:
nwdbg RAccessOn
activate
exit
Close the Terminal
If your using some other kind of VOIP router, YMMV. Do some searches for enabling this on your specific model.
Step 3: If you haven’t already, Upgrade your Linksys router
Goto the Tomato Firmware homepage, download the latest firmware for your router model. Please read the instructions provided on their site as it contains more detail on router specifics.
A basic gist of what you will do:
- Download Firmware
- Login to your Linksys admin page
- Go to the Firmware update tab
- Browse and upload the firmware file downloaded from Tomato.
- Reboot the router and reconnect. Verify that you see the new tomato admin page.
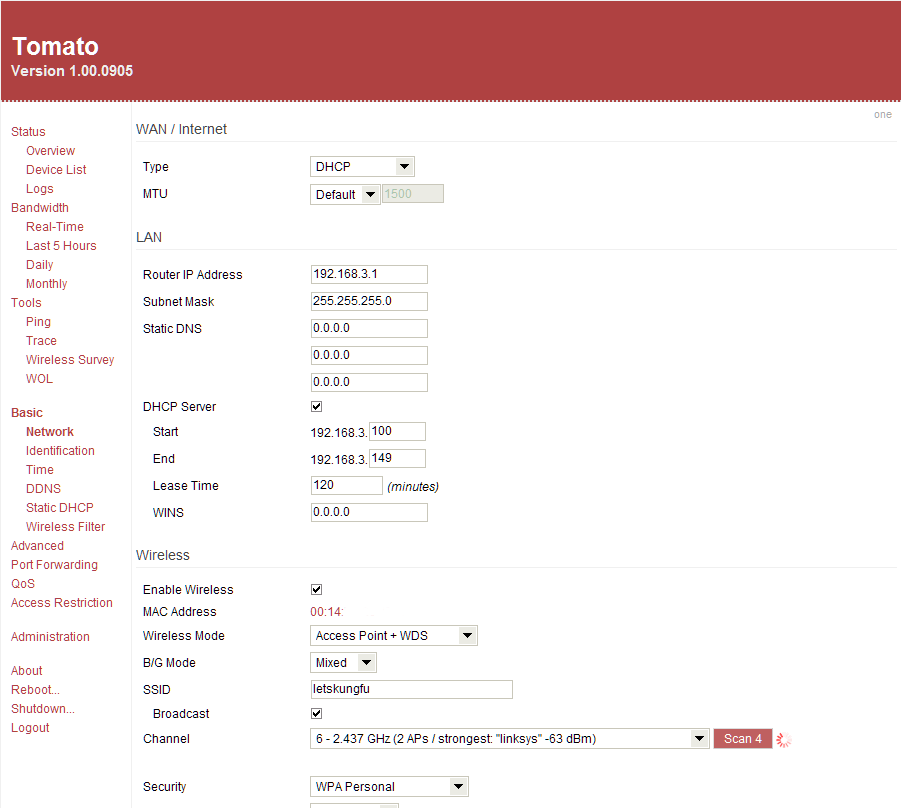
Step 4: Get The new Tomato-ized Router ready to work
Unless you have a static IP from your ISP or are using PPOE, you should be able to just set your Linksys WAN IP to use DHCP. The LAN port CAN be changed at this time if you want, but isn’t necessary. I prefer keeping my gateway IP to X.X.X.1 as it’s just easier to remember, but like I said, it doesn’t matter as long as you know.
- Log in to your Linksys Router
- Go to the Basic Network section
- Set the WAN / Internet to DHCP
- Set the LAN IP to whatever you want, just make sure it’s not the same as any existing device and not what your VOIP router is currently set to.
- Subnet Mask should be 255.255.255.0
For the DNS Settings, you can use what your ISP provides, but I prefer using DNSResolvers or OpenDNS. To save you time, here they are.
- DNS Resolvers: 205.210.42.205 & 64.68.200.200
- OpenDNS: 208.67.222.222 & 208.67.220.220
DHCP server (should you want to use it) can be left to its default or you can change it to reflect the IP ranges you want it to give out. Just keep it out of the range of what your using for your static IPs.
- Save the settings.
Step 5: Set your VOIP Routers WAN IP
We need to get your VOIP Router’s WAN IP set to a static LOCAL IP address.
- Login to your VOIP Router’s Web Panel.
- Find the WAN Administration Section
- Set it to STATIC mode.
- Set the IP address to something that Isn’t being used (it must also be different from the LAN IP of the VOIP). For mine, I set it to 192.168.1.5.
- Set the Subnet to 255.255.255.0
- Set the Gateway to the LAN IP of your Linksys router.
- Set the DNS Servers to whatever you used in the Linksys Router.
- Save the Settings.
You can now disconnect the Ethernet cables from the VOIP Device and plug the WAN port from the VOIP Router to one of the LAN ports on the Linksys.
Step 6: Get your new router working
At this point, you should hook your new router to the cable modem. I would start by unplugging your cable modem and leaving it off for a few minutes. Hook the Ethernet line from the cable modem to your Linksys router. Plug in your modem, when it is giving you the green light, Plug in the Linksys. After a few seconds, check net access. Also, login to the Linksys Webmin page (now Tomato) and check out the status page. You should see that it grabbed an external IP from your provider.
Also, check that you have access to the VOIP router by using the WAN IP you set in Step 5. At this step, you should be able to use the telephone as the internet connection is live. If not, go back and trouble shoot your connections starting with the Linksys router.
If everything is working at this point, Congratulations, the hard part is done.
Step 7: Fun with QoS
QoS lets you control your bandwidth so a local app (bit torrent for example) doesn’t run over your VOIP connection and cause breakups in voice quality or disconnects. You will have to play with the settings to get what works best for you, however I have provided a screen shot of what I’m using right now.

The upload bandwidth is very important here, especially if you are a bit-torrent user who loves to share. That number should represent your maximum upload speed. You can find this out by going to one of a number of places. I recommend speedtest.net. Make sure you have no other connections using bandwidth at the time of the test for accuracy. Once you have your max, just plug it in.
I’ve defined the levels that the QoS will operate in, the highest level will only be used by two things in my setup. One, is VOIP, and two is small DNS requests. The rest will sit in High or lower. I’ve left my download settings alone as I have a pretty decent Download speed and downloads have yet to effect my voice calling.
The next thing you need to define are your classifications. This is where you decide, who gets the bandwidth and who doesn’t. So, save your QoS settings and click Classifications.
You will need to set the IP (or MAC) address of your VOIP router to use the Highest Classification setting. The following is what mine looks like.

After entering your QoS settings, move it to the top of the list and click Save.
That’s it. Our work is done. You can monitor it through the QoS Graphs. For a test, just start up your favorite bandwidth hogging app and start placing calls. If you get some breakup, keep adjusting the settings until you find what works for you.
If your interested in installing Tomato but don’t have a compatible router, Linksys still makes one that is compatible, the WRT-54GL. Here is a link to one on Amazon.com
